
If you are a “Do-It-Yourselfer” and you like to tackle carpentry projects. You may be planning on building an addition on to your house or adding some rooms inside your home. If so, framing a wall corner and just how to accomplish that has probably crossed your mind. There are a few methods to building a wall corner and a thousand opinions on which is the best. I wanted to touch base on three types of corners and go over some of the opinions.
The Three Types Of Wall Corners
When framing a structure such as a house or room additions, you will run into some design methodology. With the types of methods, comes terminology as well. A wall can consist of corners, t’s, bottom plates and top plates. There are more but we will just focus on the corners for now. There are three commonly used corners. A “2 Stud”, “3 Stud” and a “4 Stud”.
The “2 Stud” corner to me is a joke for building anything of quality. To me, it is a way to cheaply construct a corner. It is weak and will cause issues with drywall shortly in time. A “3 Stud” corner is now known as the “Advance Framing” method. It is far better than a “2 Stud” corner but still isn’t as strong a “4 Stud” corner.
My personal choice in framing a wall corner is to use the four studs, especially on outside walls. It is the strongest of all of them, it establishes a solid union between connecting walls. This type corner is the most stable for drywall corners due to no bowing or twisting. When the adjoining studs in the corner are not solid or firmly connected to one another, this causes the drywall to crack. There are two ways to build a “4 Stud” corner. One with blocks, which I recommend for interior walls. The other is using a full stud as the space for the exterior walls. Now, the big controversy is insulation for the exterior walls and which method is the best.
[one_third_first] [/one_third_first][one_third]
 [/one_third][one_third_last]
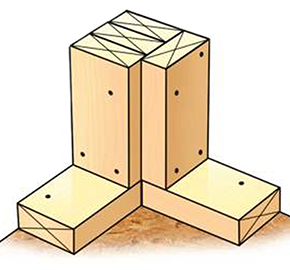 [/one_third_last]
Why Is Insulation A Concern
There are many carpenters today that are just sold on this, Advanced Framing Technique. The truth is, they can put more money in their pockets because this method uses less wood. However, it also requires more metal brackets and such, so I am not sold on the benefits. People that use this method, go on and on about how much better you can insulate the corners. First off, I look at the strength and longevity over insulating a corner. Secondly, there is no insulation loss in a “4 Stud” corner compared to a “3 Stud” corner. The wood used in framing a wall corner has insulation value.
The Advance method uses “2 Stud” and “3 Stud” corners. They claim the advantage is, running insulation further in the corner insulates the house better. This is so negligible; it isn’t worth losing the stronger structure over. A 2×4 stud has a R-Value of 4.38 all on its own. If you are building a house correctly, you should be using at least Styrofoam sheeting on the outside before siding. Done correctly, you should be placing real plywood on the corners, so that adds roughly a R-Value of .60. Styrofoam sheeting adds another R-Value of 4 on the average, top of that. Then you have to consider the R-Value of the actual siding. So, in total you have 8.6 or higher just from the building material used before siding. Most walls have R-13 fiberglass insulation in them.
The Nonsense
Personally, I just do not see the big controversy over framing a wall corner vs insulation value. Wood offers an insulating factor and as long as you have all gaps sealed from air, you are fine. Here is the crazy part of this whole argument, that makes the whole discussion seem stupid. You can obviously see a lot of wood piled up in a “4 Stud” corner, right? Where this argument is just stupid, what about the studs running along in the walls? You only put the insulation in between the studs, the studs are just as bare without insulation as the corners.
In all my carpentry days, I have been is some houses that haven’t had the walls painted in over 30 years. On all the exterior walls, you can see the where the studs are through the drywall, however you can’t see the corners. The reason for the studs showing through the drywall is, due to the lack of insulation and moisture barrier. Don’t let anyone talk you out of building a “4 Stud” corner because it isn’t insulated. That is just plain nonsense.
Variations Of A 4 Stud Corner
There are two ways of framing a “4 Stud” wall corner, one with blocks and the other with a full stud. Many builders will just use the blocks, as this cuts down on material use. However, if the block structure is used on an outside corner, you will want to pack the gaps with insulation. If you use a full stud as the spacer instead of the blocks, that will serve as insulation. Not only does the full stud help on insulation, but also increases your corner strength.
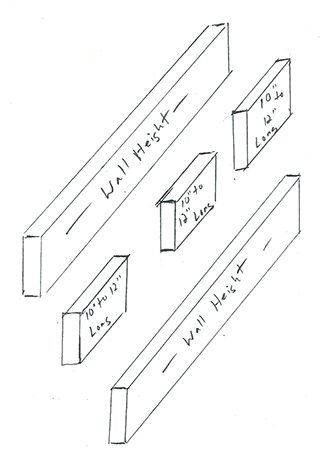
Corner strengths are really important if you are building a multi-level structure or want to go with a high-pitched roof. If constructing a “4 Stud” corner using blocks, you will want the blocks to be between 10 to 16 inches in length, spaced evenly. For using a full stud as the spacer, you would just replace the blocks with the full stud.
If the corner you are constructing is for an interior wall, I recommend using just the blocks. You wouldn’t have to worry about insulation or strength. Actually, for interior walls, you could get away with just using a “3 Stud” corner. Although I am not that big of a fan of the “3 Stud” corners only due to possible drywall corner cracking. However, if you assemble it well enough, it should do fine. One thing you should note, in constructing a “4 Stud” corner, the actual 4th stud comes from the adjoining wall. So, when constructing a “4 Stud” corner, you won’t be using 4 studs. See example of construction below. As mentioned, replace the blocks with a full stud if doing exterior walls.
Watch My YouTube Video
I had actually put together a video on this topic before writing this post. The video got me countless comments about the insulation subject. In the video or the subject line of the video, did I ever say the corner was for an exterior wall. I find it funny, how people that claim to know all about a topic, watches how to videos to leave negative comments. I don’t watch videos on how to do things I already know how to do. If I ever do, I certainly don’t criticize someone else, makes you wonder why.
Another Perspective
 I wanted to share another perspective on the corner construction by showing visual comparisons. As I mentioned, a “2 Stud” corner is something I would never use. No strength at all plus there is no nailer edge for the drywall.
As you can see to the right, metal clips have to be used to catch the drywall in the corner. The idea is to screw the clip onto the corner stud, then hang the drywall on the wall  without a corner stud first. Then you pin that drywall in by hanging it on the wall with a corner stud.
 Notice the steps to hang your drywall. This always cracks out due to no real backing strength. It is great on cutting down on wood cost but consider metal isn’t cheap these days either. Plus it take more time to mount enough clips to do the job right, than it would to just construct it fully of wood.
You can see here how the other walls are stronger and join together better than a “2 Stud” corner.
[one_half_first] [/one_half_first][one_half_last]
 [/one_half_last]
The issue I have with a “3 Stud” corner is that the one stud that catches the drywall turned to its flat side. You can only use screws to hang the drywall, or at least in the corner. If you like using drywall nails, you can potentially knock that stud loose. Of course you can secure and reinforce that stud before hanging drywall. Just seems like more work and material to me. Makes more sense to just build a real “4 Stud” corner. “3 Stud” corners are good for closets and places you are not as concerned about the drywall or strength.
Anyway, I hope this post and video help anyone trying to figure out how to construct a corner. You options are laid out for you, so good luck on your projects. Also, anytime you are trying to layout a blueprint of how you would want your structure to look. No matter what you are building, it might help if you know how to sketch and draw.